
Landscape Digital painting tutorial for beginners
Digital Painting tutorial for beginners
Landscape Digital Painting Tutorial for Beginners
Software : Adobe Photoshop
Difficulty : Beginner
You will need Adobe Photoshop CS4 or Later and a WACOM tablet for the Landscape Digital Painting.This is landscape digital painting tutorial for beginners.During this tutorial you will learn how to use different brushes and their attributes and their settings. You will also learn how to use blending modes and how to work in different layers
There are three stages in digital painting
1) Blocking (Basic shapes , sizes , proportions and perspective are decided)
2) Shading (Color scheme and direction of light is determined)
3) Detailing (Final touch up and minute details are covered)
Now let us start with the Digital Painting Tutorial.
Step 1 :- Open Adobe Photoshop. Click on File -> New or simply press ctrl + N. Enter the parameters shown in image below.
Settings
Step 2: In this step (basic blocking) you will paint a sky. If you are finding it difficult to select the color range of sky, you may take help of a photograph.
Step 3 :Select a brush from a toolbox ( Icon looks like a Brush) on the left side and paint blue color and a yellow color with Warm (Orange) tint on two separate layers as shown below.
For those who don’t know how to take a New Layer refer to image below.
Step 3 : Now Go to Filters -> Blur -> Gaussian Blur and apply Gaussian Blur to blend both colors and also remove the line as shown in the image below.
Step 4 :Now you know that the things/objects at distant is more contrasted compared to objects in foreground. So now you will have to use Darker Shades of Orange or a Light Brown color to draw Mountains and peaks and play with the Luminosity of the selected color.
Once you decide the color it is time to decide which brush you are going to use. Photoshop offers lots of brushes that you can customize according to our convenience.
Step 5: You will have to use Chalk Brush and change its Orientation (Angle) so that you are able to draw abrupt Mountains and peaks.(for brushes setting refer to image below).
Step 6: Now create a new layer and draw peaks using the brush you have created.
Step 7: Create another New Layer and set the blending mode to luminosity and draw Mountain as shown below.
Step 8: Repeat the same step again but this time choose a darker color and paint mountain as shown in image below.
Here you finished with the blocking part. Now it’s time for detailing.
Step 9: Now you will have to detail the mountains. You will use similar brush but you play with the Opacity and Flow of a brush which is located below the Menu bar.Give some orange tint to show the orientation of light and height of the mountain.
Now for the mountains at the centers, add a copy of layer to the top and groups the two copies (Alt touches while approaching the separation of the two copies), which will make it possible to paint on the layer of top without that not exceeding a copy which is located in lower part.
Step 10: Now you can draw clouds using brush. Create several layers for clouds. Use Gaussian Blur to blend colors. Also use Smudge tool to spread the paint.(Smudge tool is denoted by a ‘Finger’)
(Note- Always create a New Layer for ever object you create so that you can easily make changes whenever necessary)
Setting of Smudge tool is shown below.
Step 11: Select smudge tool and spread the part until you get the desired output/shape.
Step 12 : Add a trail of smoke of an Aircraft to the scene to give more realistic effect. It will look even more dramatic. To add smoke add some broken edges to the brush. Also add some blur at the end of the trail because particle has an age’. For brush settings refer to the image below.
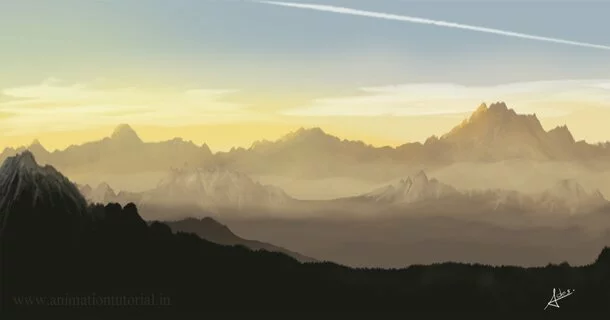
Here is the final output
Hope you enjoyed the tutorial. If you have any queries regarding the tutorial you can email us at -TWW36PPZKHGP

-
We are not interested in purchasing any products …. Thanks.

Comments