Pretty Posts
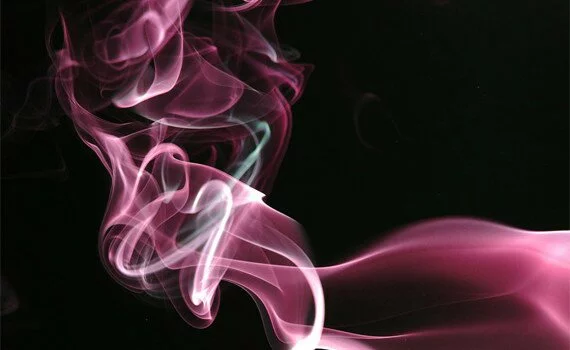
Smoke, an unwanted byproduct of combustion can be a great subject for photography.When you look at smoke photos you might think that it is impossible to take such shots but it’s actually not that hard. You just need loads of patience because the ratio of good photos to bad ones are low.
This form of photography is done indoors so it is a good way to kill time when you’re stuck inside maybe due to rain or heavy snowing. It is a good way to kill time.All you need is a camera,incense sticks,strobe,black backdrop and a tripod.If you don’t have a tripod,you can use stack of books.
There is specificcmethod of photographing smoke. In other words, there is no right or wrong way to photograph a smoke trail. I, myself, try to experiment with my smoke. The best thing is to grab your camera and experiment.
Smoke photography is one of the challenging job because subject is not completely under your control.This will fuel your creativity.
In this tutorial we will try to cover everything from setup to post processing your photos in photoshop.
Camera – You need a camera that allow users to control the aperture , shutter speed, zoom, white balance , ISO settings.DSLR/Semi – SLR allows user to control these settings
- Flash/Strobe – You need an remote wireless flash.If you don’t have one you can use strobe or a torch.
- Incense Stick – You need a source of smoke. The most commonly used item is an incense stick.
- Background – You need a dark color background. I personally use and recommend black color.We cannot afford distractions around the subject.
Reflector – Use a reflector so that the smoke trail has equal light hitting from every side.
- Tripod – We will shoot our subject in low lighting conditions.We have to keep the camera steady to avoid blur or camera shake.You can use a stack of books.
- Patience – Loads of patience.Smoke photography can be frustrating.You might not get the pattern you want.Be patient.
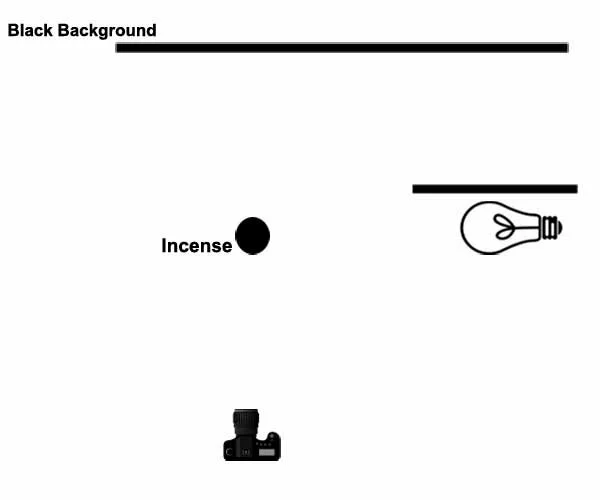
You need to make sure that there is no light spilling on the background. Remember, our purpose is to focus on the smoke and to minimize the attention on the background. You also cannot afford any light hitting the lens as it will cause lens flares to appear in the image. Below are some techniques for the setup.
- Pull out your black background sheet and hang it in the back.
- Place the incense stick 3-4 feet away from the black background.
- Put the wireless flash 2-3 feet away from the incense stick on left or right side and cover it with black sheet from sides so that the light does not spill on the background when the flash is fired.
- Place the reflector on the opposite side to that of the flash.
- Sit your tripod and camera 2-4 feet from the incense stick facing the black background.
Make sure you avoid any light bouncing off the background or directly hitting the lens. Explore around and try different angles of flash placement to get the best setup for your need.
- Shutter Speed – Since smoke is constantly moving, you need to have a fast shutter speed to avoid any blur or movement from being recorded.
- Aperture – Use smaller Aperture ( higher f-stop).
- ISO – We are shooting in a low light situation.Increasing ISO will affect the quality of image.Use low ISO (100-200)
- Light – Low ISO setting,Small Aperture , Fast Shutter speed will get you dark images with less details.Use light/flash at full strength.
- Fix the black back drop to the wall. Place the incense stick a foot away from the background.
- Now position the strobe such that it points at the tip of the incense stick. It can be placed either to the left or right side of the incense stick.This light allows you to focus on the incense stick.
- Now place the strobe/flash on the opposite side at half a foot distance from the incense stick.
- Place the black cards on either side of the strobe so that light from the strobe does not spill out to the background.
- Now light the incense stick and start the smoke.Switch on the table lamp.
- Aperture – f8.0
- Shutter speed – 1/200th of a second
- ISO – 100
- Image Format – RAW format.
- Start clicking until you get the desired pattern.
- Gently blow the smoke to get different forms and shapes. Once you are done with this, you can let your imagination run wild by placing 2 or 3 incense sticks that in turn should produce smoke of completely different shapes.
- Once you are done with shooting the smoke pictures, it is time to proceed to the post-processing part of this fun exercise.
- Open the picture in adobe RAW.
- You increase the black a little bit if you feel there is some spill light in the picture. Adjust contrast and exposure until you are satisfied.
- Open the image in photoshop.
- Make a duplicate layer.
- Select paintbrush and set your foreground to black and paint out the unwanted smoke in the picture.
- That’s it. You have a smoke picture. If you want to color it try Hue & Saturation adjustment layer.
- Also try to play with colorize option under the same adjustment layer.
- If you want to make the background white, Go to Image > Adjustments > Inverse. This will make the background white.
- Again, you can always break the rules and still come up with extraordinary pictures. Play around until you are satisfied.
I hope this post has been helpful and good luck with your smoke photography.


